
"Just call it Quilting"
|
Adventure Sailing
Canoe
"Just call it Quilting" |
Sail
This is most challenging part of the project and will probably require some sort of deal with the first mate, particularly those interested in machine quilting, if it is to be finished properly. I haven't seen a sail entered in a quilt show before but I can't see why not – it's big, flat and can be colourful.
A batwing sail design was chosen because of its simplicity, its short mast and its ability to be easily raised, lowered, reefed and stowed from a sitting position. I chose the 70sq ft option which is a much larger sail than the American Canoe Associations 44 sq ft but can be easily reefed to a similar area (42sq ft) – and reefed again to half that for very strong winds.
Another much easier option I would now recommend is a Polytarp sail which can be made without a sewing machine. Polytarp sails are very cheap simply constructed polytarp held with gaffa tape, both of which are available in colours, including the traditional white.
After sailing in the confines of Coopers Creek I was happy with the sails performance. I was able to handle a few bullets without causing the first mate too much distress and move at a respectable pace in light winds. Although the top speed in strong winds would be nowhere near the speed of the Caper Cat, the speed in light breezes was similar and hence quite satisfactory.
THe following instructions are for a sewn sail. A Polytarp sail's construction is simpler.
Sheet 6 shows the pattern for the sail with greater detail. Note that the drawing shows the finished size without spar sleeves. We were on our own when working this one out and used the Cat sail as a reference. If you choose a smaller or larger sail you will have to redraw the pattern and use trigonometry to recalculate some of the dimensions. The material used is called “Rip Stop Nylon” and is often used in hiking tents and yacht spinnakers. It is commonly available in large sewing material stores such as Spotlight in Victoria and large camping stores such as Anaconda in Victoria . It comes on rolls 1.45m wide and at about $6.00 per metre is cheap. I had to visit three stores to get the colours I wanted – the Lake Eyre Yacht Clubs blue, red and white (I omitted the black as it would make the boat look like a pirate ship). Of course every flouro colour imaginable was in stock!
All joins use the “monkey grip” seam which results in a strong join. Our hike tent has the same seems and if you've ever been camping in the desert when a squally change hits you know there can be no stronger join.
Sail Cutting
Sail cutting requires some care - measure twice and cut once. A light weight sail such as this needs reinforcing seems which are arranged to utilize the available material width. The material has a grain easily indicated by the square grid of the thicker rip stopping threads. The idea is to keep this grain square to the load. In this sails case having the grain follow the leech (rear edge) of the sail appears adequate.
When marking use sewing pencils to mark the finished edges of the sail. Use a white pencil for the coloured panels and a black or blue pencil for the white panel. The cutting diagram shows the extra to add to each side that is required for seams, ropeways and spar sleeves. For example the “+180” appearing on the edges where the boom and gaff sleeves are located means that this edge must be extended another 180mm to allow room for the sleeves. Leave extra if you are not confident but be sure to sew only after ensuring finished edge lines meet.
You may choose different colours but in this description I will describe the panels by the colours we used.
|
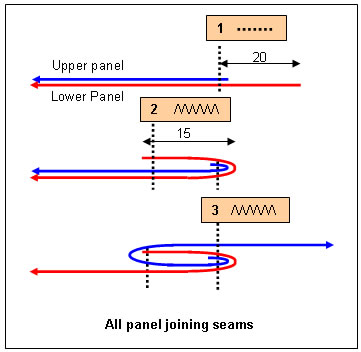
Top panel The top two (blue & red) panels are each made from two right angled triangle sub panels sewn together along the longest adjacent side (2357 long) so that the seam is bisecting that panel's isosceles triangle radiating from the same point as the gaff and battens. The first triangle is cut from the start of the roll with the right angle in the lower left corner. The vertical dimension is half of the leech dimension for the panel plus 20mm for the mid panel seam. The horizontal dimension is the middle seam dimension plus the leech hem dimension. Once these are marked the extra material for the gaff sleeve (180mm wide) is added to the hypotenuse. Once you are confident your dimensions are correct cut along the outside hypotenuse as drawn in white on the diagram. The second (blue) sub panel is cut from the remainder (that is the upper triangle now attached to the roll). It is very similar to the first except that the +180mm gaff sleeve is not required. Instead add +20 for the seam adjoining the red panel. The two sub panels are sewn together as per the Panel Joining Seam diagram. In this diagram the upper panel of any join (shown as blue) is laid over the lower panel (red) for the first line of stitching with the bulk of the material to the left and hence free of the arm. Just remember “upper panel on top”.
|
 |
|
Centre Panel The red panel is cut as the top panel with the exception that both sub panels have only the +20mm joining seam on their hypotenuse. The two centre sub panels are joined with a Panel Joining Seam.
|
|
|
Bottom Panel The bottom panel has a shallow triangle cut out of the top which becomes the bottom triangle. The bottom edge of the bigger piece and the top edge of the shallow triangle are curved convex to give the sail some aerodynamic shape. Mark and cut the large piece first as shown paying attention to its position on the roll. That is place the larger end to the right hand end of the roll with the squarer corner in the bottom right hand corner. This allows room for the small triangle. Use a flexible piece of wood/plastic to set the curve. We set it at 40mm about 1/3 back from the mast. The curve was cut first followed by the remaining cuts shown as violet lines in drawing. The triangular shaped bottom piece has its curve cut first along the long adjacent side of the triangle with the fattest part of the curve 1/3 back from the right angled corner. The large piece just cut can be used as a template. The hypotenuse is the same length as the large piece's angled side (2555). The smaller adjacent side is 366 +20 for panel join. Then mark the 180mm wide boom sleeve along the hypotenuse as was done with the gaff in the top sub panel. Cut along the outside lines. |
 |
|
Combining Panels Panels are joined using the same type of seam used to join the sub panels. As shown the diagram the upper panel is placed over the lower one when sewing the first line of stitching. In order to reduce bulk on the arm (right hand) side the first panels to be joined are the white and red with the red panel on top of the white for the first line of stitching. After completing the white-red join repeat with the red-blue join. Blue is on top as in the diagram.
|
 |
|
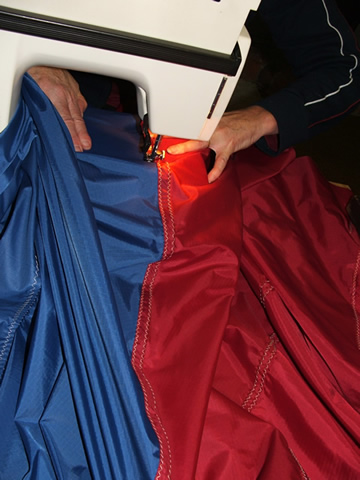
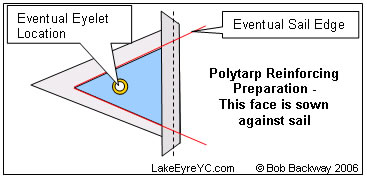
Polytarp Reinforcing Pieces From now on the Polytarp strengthening pieces are sewn in wherever eyelets will be fixed. Their location is shown on the diagram as light blue triangles or strips. The triangular corner pieces are shaped to fit the final edges of the sail and are about 150 mm wide. They are prepared by sewing a larger triangle of matching sail cloth to the Polytarp piece with one line of stitching as shown in the diagram. This line of stitching is on the non sail edge side of the piece and the fold will be placed under the reinforcement between it and the sail. The three main corner reinforcing pieces are sewn onto the sail with extra rows of stiching as per the photo. Detail on the location of these pieces is provide in the sections on sewing the adjacent edges of the sail. The batten eyelet pieces are 35mm wide and simply sewn in with the leech hem. The mast lacing reinforcing piece is sewn in with the lacing hem.
|
 |
 |
|
|
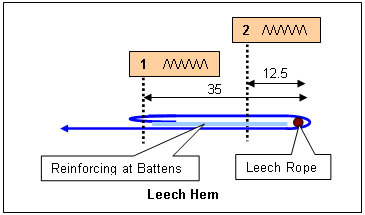
Leech (rear edge) Hem The leech hem has a rope of 3mm diameter (Venetian blind cord) in it to strengthen it. The 3mm cord is measured and laid along the leech ensuring 300mm of cord extends beyond each end. The top end will eventually be tied to the gaff tightening saddle. A small vertical slit is made in the hem about 100mm from the bottom of the leech to allow the cord to exit. The hem is sewn as per the diagram. Guide lines marked about 40mm in from the final edge of the sail will help with the first row of stitching. Ensure that the cord remains inside the hem and don't forget to sew in the top and bottom reinforcing triangles and the two batten eyelet reinforcing pieces in the correct places. The reinforcing triangles are lined up with the gaff and boom sleeves so the sleeves two inner rows of stitching will hold the reinforcing piece along those edges. The second row of stitching on the leech hem holds the cord against the leech edge. |
 |
|
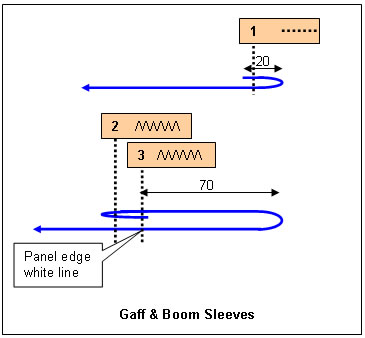
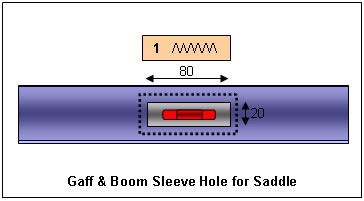
Gaff Sleeve Refer to the gaff detail on Sheet 5 to determine the location of the small hem to be sewn at the bottom of the gaff. Sew a similar hem square to the gaff edge at the top of the sail. Before sewing the sleeve a rectangular hole 80x20mm is required in it1200mm from the gaff pivot for the halyard saddle. It is made by cutting a slit about 60mm long. From each end of this slit two 45 degree cuts are made into each corner. The flaps are bent inside and zigzag hemmed. The gaff sleeve can then be sewn according to the diagram. The top Polytarp reinforcing piece is sewn in with the gaff sleeve's two inner rows of stitching.
|
 |
|
Boom sleeve Before sewing the sleeve a rectangular hole 80x20mm is required in it 1550mm from the gaff pivot for the main sheet saddle. It is made as above for the halyard saddle. The bottom Polytarp reinforcing pieces are sewn in with the boom sleeve's two inner rows of stitching. |
 |
|
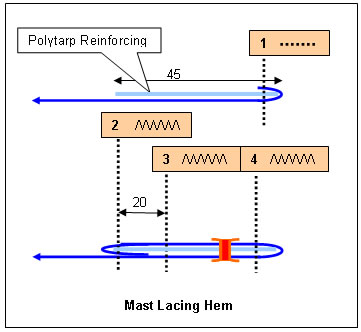
Mast End of Lower Panel This panel has Polytarp reinforcing along its entire length for the mast lacing eyelets. At this stage it pays to assemble the mast, gaff and boom with the sail sleeved over the gaff and boom. Check and re-mark the mast facing edge and the top and bottom hems for this section. Note that the bottom reinforcing piece is a trapezoid to allow clearance for the boom to mast fitting. Sew the hem and reinforcing as per the diagram . |
 |
|
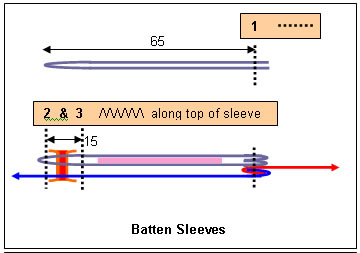
Batten Pockets Batten pockets are constructed as shown in the diagram and sewn on to the sail as per Sheet 6. The upper blue sleeve is sewn over the bottom of the blue panel and a red sleeve over the bottom of the red panel. Reefing eyelets will be placed between the two upper rows of stitching. |
 |
Eyelets
Before fitting eyelets the reinforcing pieces have extra rows of stitching placed parallel to the (first) inside row. Three 12.5 mm eyelets are fitted in each corner of the sail as shown on Sheet 6.
Two 8mm eyelets are placed along the leech hem about 50mm from the bottom of the sail and 30mm apart. They are the smaller yellow dots at the bottom of the leech in the mainsail pattern. The bottom end is brought out of the hem through the upper eyelet, reenters through the bottom one and exits again through the top one. When trimming the sail this line is pulled to take slack out and knotted.
An 8mm eyelet is placed in the leech hem at the leech end of each batten for the batten ties.
The mast lacing uses 8mm eyelets at about 100mm centres located as shown on Sheet 6 and detailed above in the Mast Lacing diagram.
The reefing ropes use 8mm eyelets at about 300mm centres through the top of the batten sleeves located as shown in Sheet 6 and detailed above in the Batten Sleeve diagram.
Jib
Sheet 6A details the jib which was added prior to the June 2007 lower Warburton River trip. The luff of the sail has a 3mm stainles cable inside the seam. The cable has eyes swaged at each end for the lifting and furling gear. That's right I've put furling gear on a canoe jib! It just makes it easier to stow the sail. Jibs tend to flap a lot when not in use and disturb the First Mate, particularly when she sits under it.
The jib is sewn as per similar parts of the mainsail. Cord is inserted in the seem along the foot and leech of the sail. The cord is tied to the stainless cable eyes and looped and tied through eyelets at the clew.
A stainless saddle on the bow of the canoe provides the lower attachment and a stainless eyebolt through the top of the mast the upper. An additional cleat on the outrigger crossmember is provided to tie off the jib halyard. The jib sheet is simply knotted at the clew and each end passed through a plastic fairlead screwed into the deck on each side of the boat about 300mm aft of the front crossmember. Make sure it clears the leeboard. The sheet has a figure of eight knot on the end to prevent it from pulling all the way through the fairlead.
ver 2.0 2602