
"Stability and Power"
|
Adventure Sailing Canoe
"Stability and Power" |
Outrigger and Outboard Bracket
These two components were added before the March 2004 Warburton River trip in which the canoe served as a tender to the 14 foot catamaran “Peril”. As this was my first trip on this river, and I was unsure of conditions, the canoe had a secondary purpose as a backup should the river be found too shallow as we approached The Lake or through some misfortune the catamaran become unusable. With only one outboard motor remaining the critical component, having two craft, one easily paddled, made us feel safer.
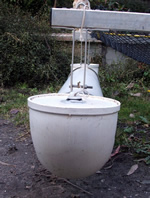
A search on Google provided a few images of flimsy outriggers that wouldn't last five minutes if you let the kids loose on them in a town lake let alone an adventure. A visit to a large canoe supplier provided a solution. While he could order an outrigger for me at $200 he suggested I simply make one out of 150mm plastic pipe. What a great idea!
On the way home I dropped in to my favorite plastic plumbing supplier who sold me a “damaged” length of 150mm SWV UPVC pipe and two 90 degree bends. I planned to turn my own discs out of grey PVC sheet for end caps and cut off the pipe overlap at the top of the bends to make the outrigger look less like a piece of plumbing. I wouldn't do this again as two endcaps would have been quicker and give more height to the front of the outrigger and prevent it from ploughing in as often.
Next stop was the aluminium supplier. I already had a scavenged length of 40mm square tube having a 3mm wall thickness. I thought then it may be too heavy but the knocks the outrigger has taken has convinced me otherwise. All I needed was a length of 40mm x 3mm bar for the brackets.
 |
Refer to Sheet 1 for diagrams mentioned on this page.
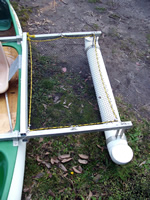
Outrigger crossmember spacing is determined by the seating arrangement of the canoe. Mine has a front seat and a rear seat with a large storage area in between about 1.2m long. The logical place for the crossmembers was at each end of this storage area where the deck already spanned the canoe. Later when fixing the position of the mast, this meant that it was further back than usual but I had no choice if I wanted to carry two persons plus gear. Thus the crossmembers were spaced 1.2m apart outside to outside.
|
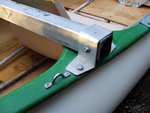 |
The crossmembers are held to the deck with four square saddles bent from the 40 x 3mm aluminium bar. They are bolted through the deck and shell of the canoe. The nuts are outside the shell and a piece of 3-6mm aluminium bar as wide as the coaming allows spreads the load of the nuts. The saddles had to be tapered on the outside to cater for the curve in the hull and the bends on a slight angle to cope with the curve of the deck, ie, make the tops of the saddles fit flat on the crossmember and adjust the vertical sides to meet the deck. Make a cardboard replica first to check your bends. |
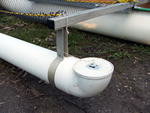 |
If your crossmembers are 1200mm apart then your pipe should be cut at about 1350 to allow for the end 90 degree bends' overlapping glue joint. If your crossmembers are spaced further apart then lengthen your pipe to the same amount. Glue the end 90 degree bends and end caps to the pipe. The endcaps will need a short length of pipe inside the joint.
|
 |
The pipe brackets are measured according to Diagram 2, drilled for 6mm bolts, and the right angle bends done, middle ones first, in a vice or bender. All bends are in the same direction. The curved part of the bracket is made by bending the centre of the bar around a solid cylinder slightly less in diameter than the pipe to allow for spring back. A 6mm bolt clamps the brackets on to the pipe and each bracket is bolted on to its crossmember using two 6mm bolts. It pays to drill the holes in your crossmember after the brackets are mounted on the pipe to set the hole spacing so the vertical parts of the bracket are parallel. |
 |
Although not required for the non sailing version the 40mm square tube leeboard supports are bolted to the crossmembers parallel to the float. One is above the crossmember and one below so that they are in the same vertical alignment with the outrigger side just clearing the curve of the shell along its whole length. Refer to Diagrams 1 & 4. |
 |
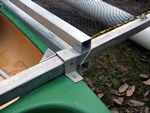
The outboard bracket uses the same 40mm square tube and is mounted behind the rear seat about 300mm from the stern. In my case I had to bend it up and over the curve of the deck. The top curve was too sharp for a bend and had to be cut and a 3mm plate pop riveted to each side for strength. About 200 mm overhang into the outrigger space was enough to mount the 2HP Mercury outboard so that it doesn't chop into the hull if turned accidentally. I fix the outboard and use the rudder to stear. A saddle is riveted to the front of the bracket and between the outboard mounting screws to allow a safety rope or padlocked cable to secure the outboard. It's hard to find an outboard at the bottom of a muddy river! |
| Saddles are also riveted to the crossmembers to enable a rope edged net to be stretched between the outriggers. The net is a great place to store wet and muddy gear (if tied on). Look up fish nets in the Yellow Pages, a 25mm mesh of non synthetic fibre is best. | |
ver1.1 0607